Updates:
4/21/05: Fix for those unable to see mask outline when returning to standard mode from Quick Mask mode (see M1, Crab Nebula section).
4/22/05: Added links to Tom How's and Jan Timmermans tutorials on acquiring and post processing where black and white webcams are used.
5/5/05: The major rewrite of the Levels and Curves section is complete along with a step by step demonstration of how to process a grayscale deep space image.
5/9/05: A 'printer friendly' version of tutorial is finished. See below.
Printer Friendly Version of Tutorial
(You can also right click on the above link
and 'save target as' for later viewing or printing)
If you're using a monochrome (black & white) webcam or other monochrome ccd imager, this tutorial is for you. It is also useful for processing the luminance channel in RGB color images.
PHOTOSHOP And The LIF²T © Method
The LIF²T Method (Lasso, Invert, Feather, Filter, and Tone) is my organized approach to the post processing of grayscale webcam images in Photoshop.
For the rest of the tutorial I'll be using my image of M64 the Blackeye Galaxy and a few other deep sky objects because they lend themselves well to demonstrating the processing techniques we'll be using. Look at M51 at the end of this tutorial where the labels on each image indicate the tools used.
The steps outlined here are not by any means the last word in image processing but merely represent the level I have reached in my own learning curve. I hope my sharing them will move a fellow amateur astronomer somewhat closer to the 'perfect' image.
A very useful way to follow this tutorial is to right click on the image of M64 below and select 'save picture as', then open it in Photoshop. That way you can use the techniques as they are discussed.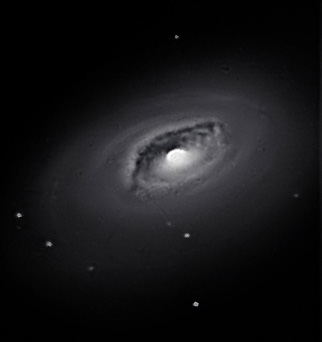
Make sure Photoshop is set to RGB Mode (Mode/RGB Color) before proceeding.
LASSO INVERT FEATHER
At the outset I want to discuss the three most important tools in Photoshop for deep space image processing: Lasso, Invert and Feather. I use these three in almost every aspect of image processing including stretching, toning and filtering. Image post processing of deep sky objects can present some unique challenges. For example, most galaxies have fairly detailed inner cores while at the same time they can have very wispy almost ephemeral spiral arms. Nebula can have similar characteristics where you have to process detailed inner cores and wispy outer cores or bloated stars that are embedded in the nebulosity itself. If you attempt to process these images as a whole you will gain detail in one portion of an image while sacrificing another. That's where the Lasso tool comes to the rescue which is usually found in the Photoshop tool box and looks ,as the name implies, like a lasso with a knot on the end. Using the lasso tool just draw a circle anywhere on an image or draw several circles by holding down the shift key as you draw each one. Make sure you close the end of the circle completely (first image of M64 below).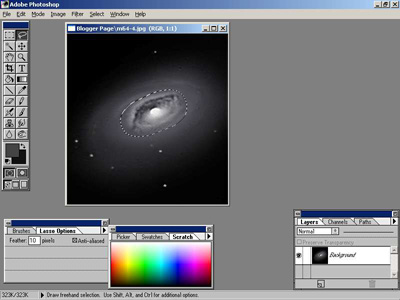
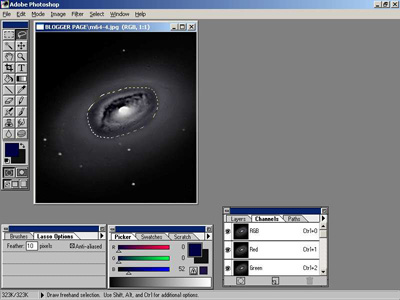
Now go to Levels (Image/Adjust/Levels) and make a sharp move using one of the sliders. You will see that the tone within the circle changes significantly while the rest of the image remains the same (middle image). Now click on cancel, leave the circle where it is and move your mouse pointer up to 'Select' and click on Inverse. Go back to Levels and move one of the sliders sharply to the left or right. Now the image area outside the circle changes and the area within the circle remains protected (bottom image). Now we have a technique where we can protect a galaxy core while we work on getting some definition to those wispy spiral arms or protect the arms while working on the core.
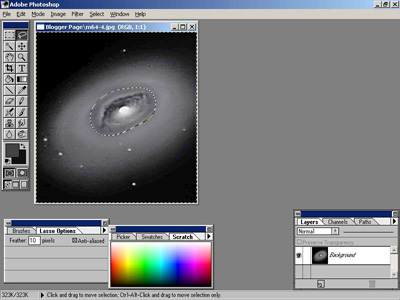
But if you were to just use these two tools alone, you would soon find out that for some reason the two or more separate areas you processed independently of one another just don't look natural. Their edges are too sharp and they don't blend well together. That's where the Feather tool becomes one of the handiest tools on Adobe's invention list. This tool is located in the Lasso tools dialog box where the brush sizes are also located. Click on Lasso options and you will see the Feather box where you can set the size in pixels. I usually work in pixel sizes from 5 to 50. Experiment with this setting and you will see that the different Lasso'd areas now blend very well together with no more sharp edges. You must draw a new lasso for each change in feather size to take affect. Once you are done making your adjustments to a protected area just click on the image and the end result will appear. Keep in mind that a side effect of processing different areas of an image is that the tones of these parts may not match and will require additional adjustments usually involving the use of levels or curves.
Once you have set your feather size in pixels and drawn your lasso you may want to view the actual size area that will be affected prior to making any changes. To do so just click on the Quick Mask button located at the bottom of the tool bar. It's one of two buttons that look like the sun or a Japanese flag and is the one located on the right. The lasso'd area will be in red. As you change the feather size and then redraw your lasso from Standard Mode (the Japanese flag button on the left), then switch back to Quick Mask mode (the Japanese flag button on the right), the red area will change. Try it. Here's an image with the feather set to 10.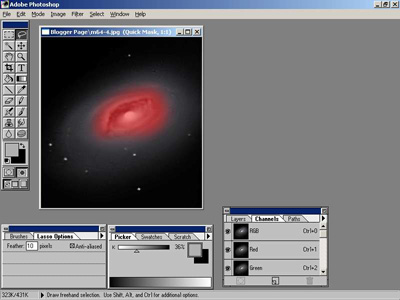
Tip: Hmmm .... I wonder what would happen if we set feather to 50 and then drew a lasso around the entire M64 galaxy and clicked on inverse? Then we played around with the Levels sliders or Curves or maybe Selective Color. I'll bet the entire background would change without anything happening to the galaxy at all! Read on.
When you have a complicated shape like M1, The Crab Nebula (see image below), with all of its surrounding filaments, you may want to try a slightly different technique to protect it from processing or to process it alone. Click on the Quick Mask button, then select the Eraser tool and choose the smallest or second smallest brush you can find and begin to draw over the filaments. Once finished you can then draw as intricate an outline as you want all the way around the portion of the nebula near the inner tips of the filaments. You may want to use the Zoom tool to enlarge the image before drawing. You'll see that the lines will all be in red. When you're done with that, pick larger size brushes until you have completely filled in the outline. The second image below shows a partial fill in as well as the line outlining the nebula.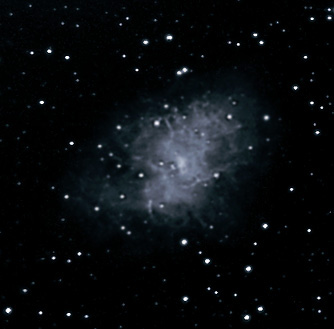
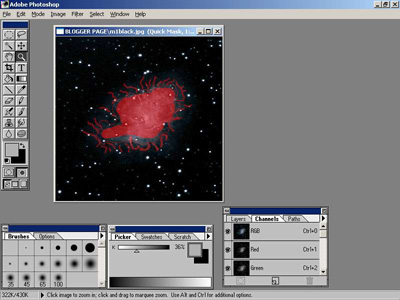
Once the nebula mask is fully filled in click on the standard mode button to the left and you'll see a nice outline of the Crab Nebula. Now when you attempt to make a change in the image, only the background will change. Select inverse and only the nebula will change. That's right, just the opposite of what happens when you draw just a simple lasso. If you do not see the outlined area when you go from Quick Mask back to Standard Mode, just do this: while in Quick Mask mode double click on the Quick Mask button and click on 'Selected Areas' then click ok. Then delete your image, reopen it and the functions should work as described above once you have redrawn and filled in the Crab Nebula and switched back to Standard Mode.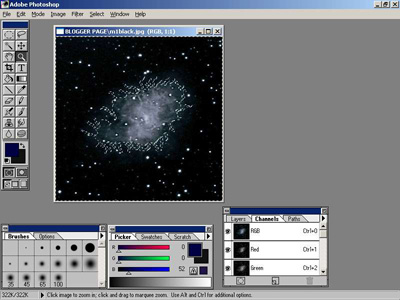
And here is the final result, a clearer image showing more defined filaments.
Tip: What would happen if we clicked the Quick Mask button, set the brush size to the second largest size, outlined just the filaments alone and nothing else, went back to standard mode, clicked on inverse and adjusted the brightness by using lets say the curves tool? Take an image you have or right click on my image of M1, save it and try it!
TONING
This portion of the tutorial includes a complete step by step demonstration of how to process a deep space image using Photoshop and at the very end PixInsight.
Please keep in mind that the following discussion involves the manipulation of grayscale images but I use many of these same techniques for color images as well.
Lets move deeper into Photoshop where all of the 'heavy LIF²Ting' (sorry, couldn't resist) of image manipulation is done. I use Photoshop 3 for image processing and while other higher versions of Photoshop have the same tools they may be in different locations.
As we go through the tutorial and make use of the Levels and Curves functions, you may notice that your histograms in Levels and your curve adjustments in Curves don't match up with my instructions. That's ok because the way you use the tools will never completely match the way I use them. Just try to come close to matching the images shown. Always pay more attention to learning how the tools are actually used rather than the specific adjustments I instruct you to make.
After opening the final Registax image, I always start out a Photoshop session by going to Levels (Image/Adjust/Levels).
Here's an image of M64 which was stacked in Registax3 that you can work on while we are going through the tutorial (just right click on it and 'save picture as') and load the image into Photoshop. Keep in mind as we go through this portion of the tutorial that we are working in JPEG or .jpg format which contains less information that the normal .bmp format I normally work in. So we won't be getting a final result in the image we normally would. But it will be useful enough to show what this technique can accomplish.
When you first open the Levels window you see a histogram chart, the filled in black portion of which represents all of the information contained in the image. Our task is to keep all of the information we want and to throw out what we don't want. It's actually a lot simpler to do so than you might think because all we are essentially doing is setting new black and white points in the image. Take a look at image just below. That's the histogram chart of the above M64 image before any changes have been made. There are three slider triangles, the one on the left is shaded black, the middle is shaded gray and the far right is shaded white. They represent all of the tones in the image from black to gray to white and everything in between.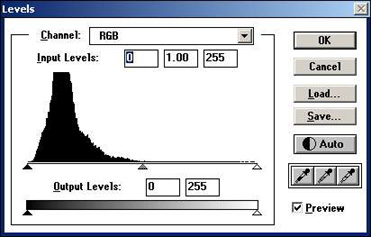
Once you have loaded the M64 image into Photoshop, click on the Lasso tool, set your Feather to 10 and encircle the galaxy core. Then click on Inverse and then on the Quick Mask button. You should see the galaxy core shaded in red. Remember, any area shaded in red is the protected area and only the area outside it will be affected by any adjustments to the image. If the core is not shaded in red, switch to standard mode and go back and click on Inverse again.
Now we are ready to make our adjustments. Look at figure number 1 of the figures labeled 1-4 below. This is the histogram of the non protected area outside the galaxy core before any adjustments have been made. Open the Levels window and you should see close to the same histogram. I say close because you probably encircled just a little bit different area of the core than I did. First drag the black slider triangle on the left towards the right just up to the edge of the beginning of the histogram (see figure 2). Drag the white slider on the right to the left until the middle gray slider reaches the unbroken part of the graph (as in figure 2). Looking at the image, you should see that the spiral arms have brightened quite a bit and that we have some noise on the outside portions that we will have to get rid of. Click on the preview box if you want to see the before and after images. Click ok. The important point of our adjustments using Levels is that we haven't thrown away any of the original information in our image that we started out with. So all of your hard work at the telescope getting this image in the first place isn't wasted.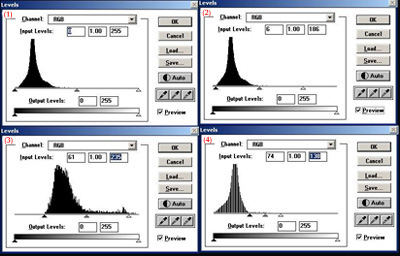
Now go to Select and click on Inverse so we can adjust just the galaxy core alone. Open Levels and you should see something similar to figure 3. This is the histogram of the galaxy core alone (which also includes the slider adjustments that we are going to talk about next). Move the left slider (black) to the right until it is just touching the edge of the histogram. Move the right slider (white) to the left a small amount until it reaches the beginning of the first small spike in the graph. If you don't see a spike, just move it in about the same amount. There is nothing magic about this second slider move. I just decided to do it because I liked the affect on the image. Nothing more. I threw out just a small amount of information for what I perceive to be the greater good for the image as a whole. You'll learn this through practice and experimentation. The galaxy core should now be quite a bit darker than its surroundings.
Next, click ok to close the Levels window and then click anywhere on the image to make the Lasso disappear. Save your image.
When you save an image you should give it a name that includes the tool you just applied to it. In this case something like m64levels-core-spiral.jpg to signify that the core and spiral arms were adjusted using Levels. It's very important to do this at each major adjustment point because, if you are unhappy with the final result, you can start over again at any point in the process.
Your M64 image should be similar to the one on the left below. Your image from within Photoshop will probably appear lighter which is ok (saving in the .jpg format can sometimes cause the image to be darker).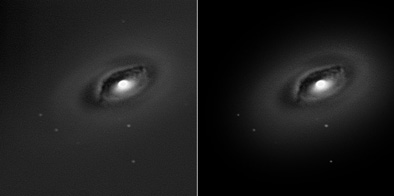
Our next task is to clean up the image area outside the galaxy by throwing out some information in the histogram. This is a third method and probably the fastest (the other two being setting a new black point and selective color) for clearing up background clutter. Click on the Lasso tool and set Feather to 30; then draw a lasso around the entire galaxy to include both the core and spiral arms. I went out about 1/4 inch extra around the galaxy spirals to make sure I didn't wipe out any potential information there. Select Inverse, click on the Quick Mask button and check on how much of the galaxy area your protecting. Click on the Standard Mode button. Now click on Levels to open the Levels histogram window. Referring to figure 4 above, we're looking at the histogram which represents all of the noise outside the galaxy that we want to get rid of (except, of course, for the stars). So let's wipe it out. Move the left slider to the right until it reaches the bottom right side of the graph. Notice in the image how the graininess disappears as you make this move. There is a small amount of information in the graph that trails out to the right of this that we don't want to get rid of because that is where the stars are located. To see what I mean take the far right slider and move it to the left. As you do so, and the middle slider reaches the right side of this information, the stars should start to brighten. As you proceed further to the left they will brighten considerably. Don't go too far to the left or you'll begin to approach some information in the spirals that will distort their tone. When your satisfied with the stars brightness level, click ok and then click anywhere on the image to remove the Lasso. Save your image. Now your image should look similar to the one on the right above. The background looks much better.
It's now time to even up the tone difference between the core and the spirals and the best place to do that is using the Curves function (Image/Adjust/Curves). This is the stage where Curves become more useful because you are able to make more subtle tone adjustments than you can with Levels. First click on the Lasso tool, set feather to 20 and draw a Lasso around the galaxy core. Now open the Curves window. We want to lighten the tone of the core but not too much because it's naturally darker than the surrounding spirals.
A very uniform and simple adjustment method for Curves that is useful for any kind of deep space image involves the placing of 3 dots on the diagonal line from where you will make all adjustments. You can always try other techniques later (one of which I explain below) but for now this is an excellent method. Referring to the figure below, place three dots in the A, B, C positions indicated in figure 1 below by just clicking on each spot. Keep in mind while making these curve adjustments they don't have to be exact and you may want to alter my instructions to suit your own taste.
Now holding down the ALT key click anywhere on the curves graph. You should see smaller squares as in figure 2 above (if not just follow along with the larger squares). Referring to figure 1 below, beginning at the A position, click and hold down while moving diagonally up until you reach just a little beyond the top left corner of the small square. Leave position C where it is. At position B move the dot straight up about halfway up the square. Click ok. Now the core matches a little closer with the spiral arms.
Go to Select now and click Inverse so we can protect the core and work on the spiral arms. Launch Curves again, hold down the ALT key and click to get back our large squares and set your three points again at positions A, B, C. Press the ALT key and click to go back to small squares. Referring to figure 2 above, drag position A to the top left corner of the small square. Drag position C to the bottom right of the square. Drag position B directly up to the top right corner of the small square. Click ok. Save your image. Below left is the result of the curves adjustments. You should still see the lasso around the core. If not, lasso the core again.
With the major curve adjustments completed, tonal range adjustments come next. Tonal range adjustments can actually be used as a stand alone curves method but I use them to fine tune our previous curve adjustments. I would expect that your tonal range measurements will not be exactly the same as mine, so the dots on the graph may be in different locations. Just adjust the curve until the resulting changes in the image are fairly close to the images in the tutorial. Activate Inverse now so we can work on the core. Bring up the Curves window and go over to the image and place the cursor over the upper right tip of the core just inside the lasso (the cursor is in the shape of an eyedropper). As you click and hold the mouse button you should see a small square appear on the curve window graph. Note its location and go over to the curves graph and click once on that spot leaving a dot where you clicked. Now go back to the upper tip of the core and while holding down the mouse button drag diagonally until just before you reach the bright white circle of the inner core. Note the location of the small square on the curves graph and go over there and click on that location which leaves another dot. You've just set the fine adjustment area for the galaxy core. We weren't interested in changing the bright white inner core and that's why we didn't include it in the tonal range measurement. Figure 1 below is the tonal range of the core before adjustments. Referring to figure 2, move the bottom point laterally to the right and the top point diagonally down to the left. As you can see tonal range adjustments require only very fine movements. Click ok to close the Curves window.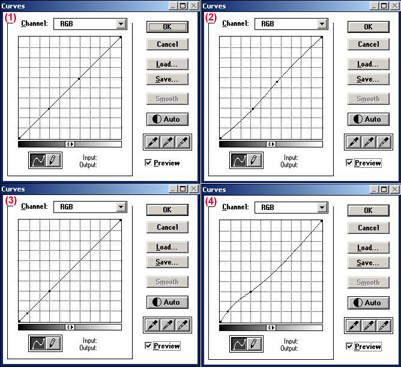
Let's set the tonal range for the spiral arms next. Activate Inverse, and bring up the Curves window again. Move the cursor to the right tip of the core again and click and hold down the mouse button, only this time move it just outside the Lasso line and observe the position of the small box on the curves graph and go over and place a dot at that position. Bring the eyedropper back to the same position on the image and move it out diagonally to the very edge of the spiral arm. Then mark that small box position on the graph. Now you've defined the tonal range for the spiral arms. If you wanted to refine this a little you could go around to different positions on the spirals and come up with an average tonal range but for our purposes one measurement is enough. Figure 3 above shows the tonal range before adjustments. Referring to Figure 4 above, grab the bottom dot and move it straight up until it reaches the line above it. I told you these were very small moves. No need to move the top upper dot, unless you want to. Click ok to close the Curves window. Save your image. The result of the tonal range adjustments is the image above on the right.
Next let's highlight some of the existing structures in the spiral arms using the Dodge tool which has a function that can be useful in highlighting difficult to process areas such as galaxy arms and nebula detail. You may have existing objects in an image that you would like to highlight or tone more which is of course what we have been doing all along. But if you set the exposure of the dodge tool to a very light setting such as 8 to 10 and select a fuzzy brush size which matches the object, filament or swirl you want to highlight and click on or run over the object you can achieve a very subtle enhancement to the image as a whole. Be careful with the use of the dodge tool because if you're too heavy handed you can end up adding information to an image that was not originally there and that's a big no no in image processing.
We want to highlight some of the faint structure in the spiral arms, so select the Dodge tool from the tool box which is shaped like a black lollipop with a stick on the end (usually at the bottom of your toolbox). If you don't see the lollipop symbol in your tool box, but see a hand or a sponge instead, go to the Toning tool options window and select Dodge tool from the drop down menu. Set the exposure level to 10 and make sure Highlights is selected. Use the first or second fuzzy brush size depending on the object filament or swirl you're trying to enhance. Then just run the Dodge tool over what you want to highlight. The result of using the Dodge tool is the upper image on the right. Save your image. You can see that the result is very subtle and in fact we don't want any big changes here.
Looking at the progress we've made so far, the stars seem somewhat bloated and not as bright as they were before. Let's correct that. Select the Zoom tool from the tool box and zoom in on a couple of the stars. Then select the Lasso tool, set your feather size to 2 pixels, and draw a lasso around a star. Then, while holding down the SHIFT key, draw lassos around the remaining stars. There are a couple of faint stars embedded in the spirals that we should also highlight (remember to hold down that SHIFT key or you will lose all your lassos!). Now select the Zoom tool again and while holding down the ALT key click on the image to zoom out to normal size. The lassoed stars image is on the left below.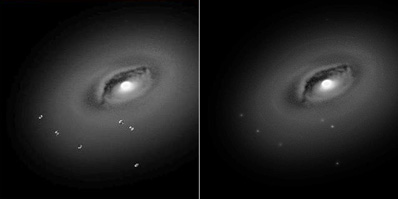
Time to bring up the Levels window and move the left very bottom slider to the right until it reads '30'. This should brighten the stars somewhat. Click ok, and move to Select/Modify/Expand. Set Expand By to 2 pixels to ensure that the lassos fall outside the stars. Click ok. Next go to the Filter drop down menu and activate Filter/Other/Minimum and set the radius to 1 pixel which should debloat the stars and probably cause them to fade. To correct the star fade, select the Toning tool (black lollipop) and in the Toning tool options window make sure Highlights and Dodge tool is selected. Also set the Exposure to 100% and select the smallest fuzzy brush size in the brushes area. Click twice on each star, which will maintain their relative magnitudes, and each star should brighten. If you go too far in brightening them, just hold down the ALT key while you click and they will dim with each click. Zoom out to normal size. Save your image. Your image should now look something like the one above and to the right.
FILTER
Let's see if we can gain more detail in the core area by doing an Unsharp Mask. Select the Lasso tool, set Feather to 5 and draw a Lasso around the core. Open the Unsharp Mask window (Filter/Sharpen/Unsharp Mask). Set the amount to 100% and the Radius to 3.0, leave the Threshold at 0. Click ok. Now activate Inverse to protect the core, open the Unsharp Mask window, and move the Radius down to 1.0. This will sharpen the stars and bring out a few details in the spiral arms. Click ok and click on the image to remove the Lasso. Save your image.
You'll probably notice that the core and a small part of the spiral arms have a grainy texture. One way to get rid of this is to use the Lasso tool to isolate the portions of the image you want to smooth and apply a small Gaussian Blur (Filter/Blur/Gaussian Blur) to them. If you prefer to use Photoshop for this, just draw a Lasso around the area you want to smooth, go to Quick Mask and make sure it is NOT in red, go back to Standard Mode, launch the Gaussian Blur window and adjust the Radial slider until you're satisfied with the results.
But I've found that a better way is to open PixInsight and use the SGBNR function (see the PixInsight link elsewhere in this tutorial). What I like about SGBNR is that it applies a Gaussian Blur to the image without affecting any edge features it finds in the image! It just smoothes image areas where there is little or no detail. Note: PixInsight requires that you be in 1024x768 mode.
From within PixInsight, go to File/Open and load in your last saved image. Hold down the ALT key and press the N key to activate preview mode. Then go to the image and drag your mouse over the portion of the image you want to preview (or over the whole image). Select the tab labeled Preview01 which appears on the left side of the image. Now look at the menus across the top and select Process/General/SGBNR which brings up the SGBNR window. Under Low Pass Filter, change the Amount from .80 to .40. Under Edges Protection, change the Dark Sides Threshold to 0.100 and the Bright Sides Threshold also to 0.100. Now click Preview01 located at the bottom of the SGBNR window and make sure you check the little box next to the image name, click ok and you should see the preview image change. See the image below which shows the preview image after the changes were made.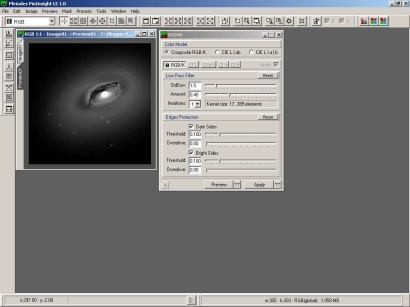
You can now alternate between the Preview image and the original by clicking on the tabs at the side of the mage. If you're happy with the changes, click on Apply located at the bottom of the SGBNR window. Save your image as a .jpg file by going to Files/Save As.
Let's go back to Photoshop to make a minor change in the image. Once you've loaded the image into Photoshop, select Image/Adjust/Selective Color, and at the drop down menu where it says 'Reds' select Neutrals. Using the sliders, set Black to +6 and Yellow to -6. In my opinion, this gives a more pleasing appearance to the image without causing any significant change.
Were done! The final image appears on the left below and the original practice image in on the right.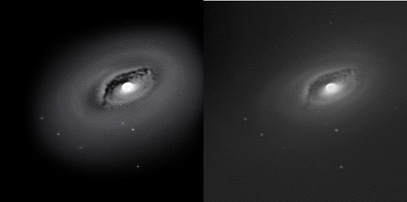
ADDITIONAL FILTERING AND TONING PROGRAMS
I will just briefly mention some additional filtering and toning programs that are free on the internet. These programs are significant additions to post processing and should not be ignored. They are also very helpful if you have an image that does not require a lot of detailed processing and just needs a quick cleanup.
Loreal [here] is a specialized program that gets rid of star halos or 'ears' which usually result from a histogram stretch or additional processing. It is very easy to use; just point and click and the halos are gone!
NeatImage [here] is a very powerful and useful program. If you merely load an image in and just tell it to use the default settings for image cleanup without changing a thing you will be surprised at the results. Be sure and try the advanced mode which gives you complete control over noise reduction levels and sharpening. It even includes the ability to match your monitor colors with printed output. Not bad for a free program! It's one restriction is you can only save in .jpg format.
PixInsight LE 1.0 [here] Within PixInsight is Pleides older program SGBNR(Selective Gaussian Blur Noise Reduction) which does just what the name implies: a gaussian blur with noise reduction. I used this on my M51 image with a good result. Just using this tool alone can improve some images significantly. It's located at Process/General/SGBNR. I haven't had a chance to explore the rest of PixInsight's features but it does seem to be a powerful image processing program that I'm sure I'll be using in the future.
Tip: There is a very helpful tutorial about acquiring images by Tom How entitled, 'How I do deep sky imaging', where he uses a black and white ToUcam SC3 webcam located [here]
As an alternative to this tutorial, there is a very informative tutorial on image aquiring, stacking with K3ccdTools and post processing using a black and white SC3a webcam by Jan Timmermans. The link is here.
CONCLUSION
I hope you find this grayscale image processing tutorial useful. It was certainly an enjoyable project for me to work on.
I fully welcome any suggestions, comments or criticisms you may have (see 'Email Rick' link on the left). After all, this is a work in progress which I will be revising and adding to as time goes by.
Clear Skys!
Rick Murray