Friday, December 17, 2004

M1 The Crab Nebula


©2006 Richard Murray
Click image for larger view.
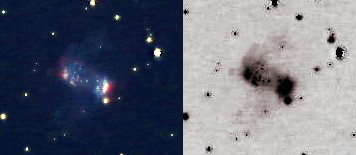

A pulsar lurks

"Imagine our enormous Sun compressed down to a mere 18 1/2 miles (30 kilometers) across and ramped up to a rotational speed equal to that of your desktop computers power supply fan (1800 rpm) and you've just described the Crab's central pulsar."

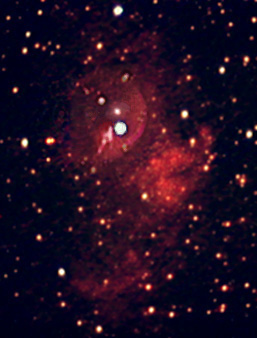
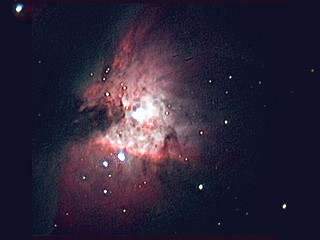
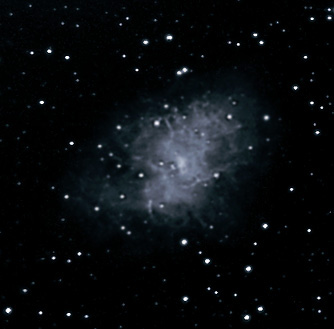
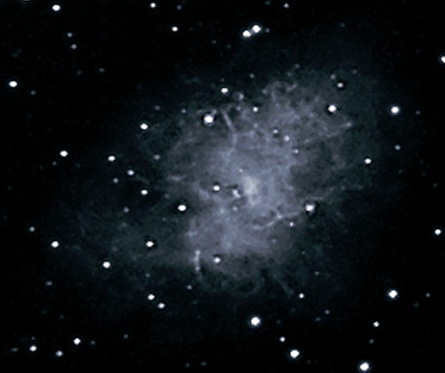
One of the reasons the Crab Nebula is such a notable object is that its sudden appearance took place only an eyeblink away at least on a 'cosmic' time scale. First discovered 950 years ago on July 4, 1054 AD by Chinese astronomers, this vast supernova explosion gained a brightness in the night sky at least four times that of Venus (-6 mag). It was visible for 23 days in daylight!

The nebula left over from the explosion is approximately 10 light years in diameter and is expanding at the rate of 1800 km/sec.

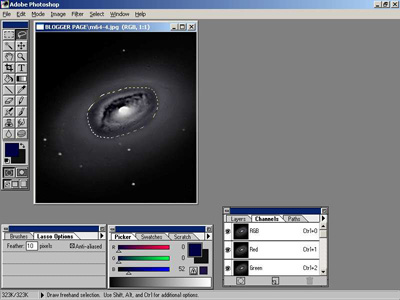
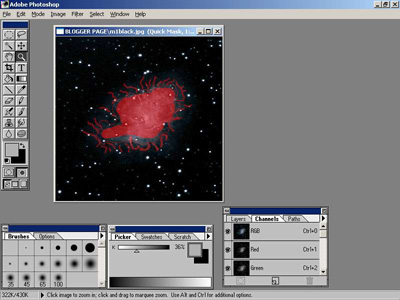
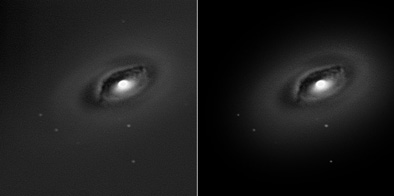
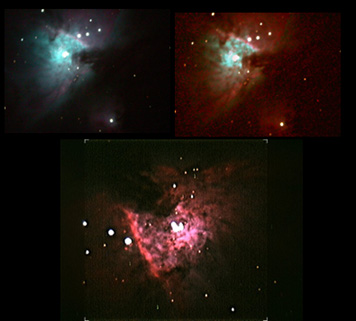
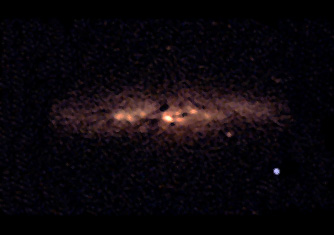
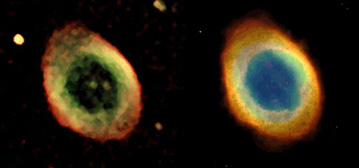
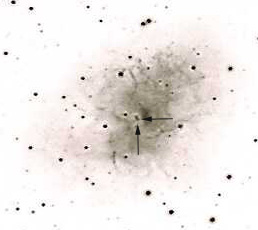
But what makes M1 so unusual is, in part, how it emits its light and the fact that it is really a nebula within a nebula. The outer nebula consists of the expanding gases and matter ejected by the supernova event. The inner nebula is the result of synchrotron radiation or polarized light created by a strong magnetic field filling the inner nebula. A magnetic field of this magnitude causes light waves to literally vibrate in the same uniform plane. The source of this radiation is none other than the source of the nebula itself. The star which went supernova in 1054 AD, has evolved into a rapidly rotating neutron star or pulsar and its gravity along with the magnetic field are pushing electrons to near light speed generating a very bright blue inner nebula core. And when I say bright, I mean bright because its overall luminosity in all spectral ranges has been estimated at 100,000 times that of our sun! It rotates or pulses at the rate of 30 times a second. Imagine our enormous Sun compressed down to a mere 18 1/2 miles (30 kilometers) across and ramped up to a rotational speed equal to that of your desktop computers power supply fan (1800 rpm) and you've just described the Crab's central pulsar.

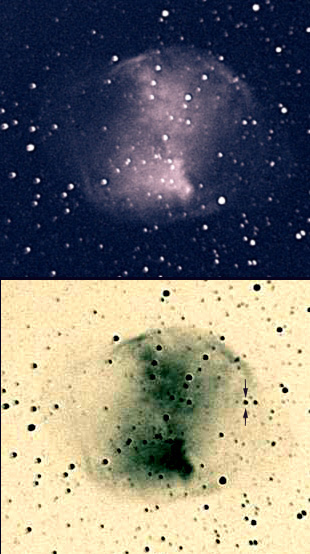
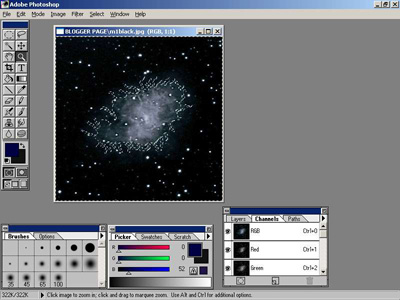
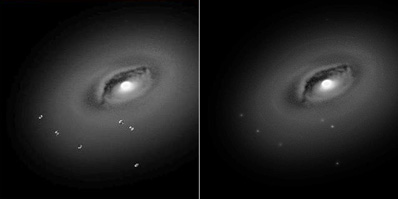
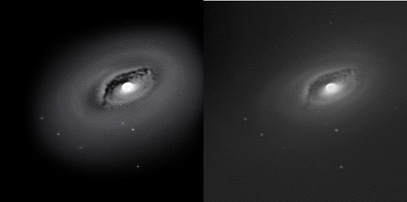
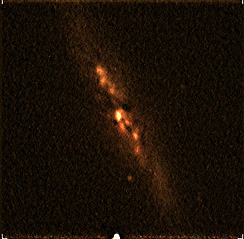
The pulsar can just be seen, in the negative image above with the two arrows pointing to it.

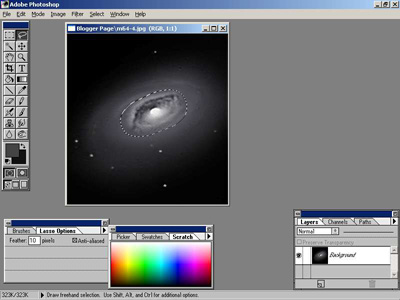
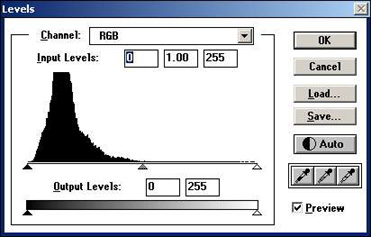
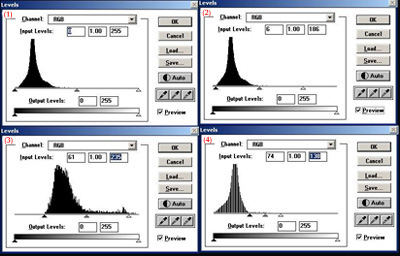
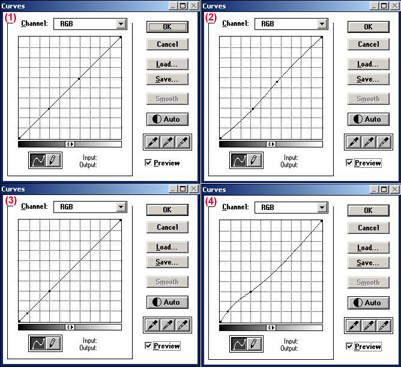
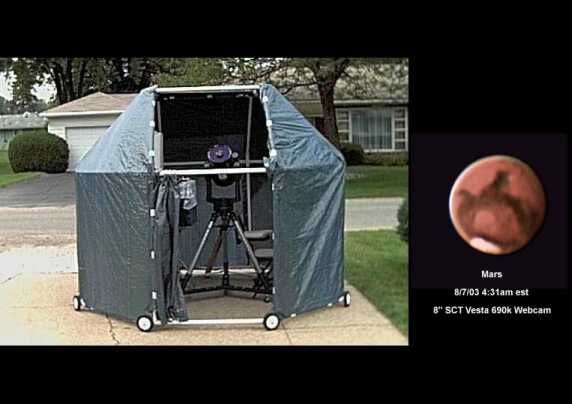
Techno Stuff: LX90, ATK-2HS, 0.6 FR, Baader IR, 10fps, 98 X 30 secs, Brightness 55%, Gamma 0%,Sat 50%, Gain 100%, White Balance nothing selected, Darks used Processed in K3ccdTools, Registax, Photoshop, Selective color added.

Tuesday, December 07, 2004

NGC7635 The Bubble Nebula


©2006 Richard Murray

The Bubble Nebula is an unusual planetary nebula located
on the edge of the constellation Cassiopeia. The central
star, which is hard to miss, is the largest star in this image
weighing in at 40 times the mass of our sun. Its extremely
strong stellar wind results in an ever expanding shockwave
that is so fast and powerful that it literally slams into previous
stellar ejections to form the ever expanding 'bubble' wall that
we see. The bubble is expanding at the rate of 2000 kilometers
a second or 4 million miles per hour.

The nebula itself is about 6 light years across which means
that the distance from the sun to our nearest star, Alpha
Centauri, would easily fit within it.

This image was made by merging two images in Photoshop -
the color image taken with a Toucam SC1.5 webcam and a
black and white image taken with an ATK-2HS webcam. The
2HS webcam has a higher resolution which allows us to see
the actual 'bubble' of the nebula more clearly. The b&w image
was taken during a full moon so as time goes by I'll try to
improve this photo by imaging during a dark sky night and
then recombine the images.

Techno Stuff: Color image with Toucam SC1.5, 9/13/04 at 4:20am est (9:20am ut), LX-90 8" sct, baader ir, gain 70%, gamma 30%, saturation 50%, brightness 50%, white balance-outside, 125 frames x 45.5 secs,60 frames out of 125 processed in k3ccdtools, registax and photoshop, dark frames used

Black & White image with ATK-2HS 10/1/04 at 12:47am est (5:47am ut), LX-90 8" sct, baader ir, 0.6 focal reducer, gain 70%, gamma 0%, saturation 50%, brightness 50%, white balance-outside, 128 frames x 23.5 secs, 65 frames out of 128 processed in k3ccdtools, registax and photoshop, dark frames used

Saturday, November 13, 2004

M77 Galaxy

Reprocessed 1/4/05


This galaxy is located in the Cetus (The Whale) constellation and is approximately 60 million light years away. The photons that fell upon the ccd chip to make up this image were created around the time that dinosaurs roamed the earth!

This is a small spiral galaxy seen face on, one of the so called Seyfert galaxies, which in this case means it has a radio source probably caused by matter falling into a black hole. It is receding from us at about 1100 miles per second. Actually saying this is a small galaxy is a misnomer. It looks small but in fact it is very large. When you include the outlying gasious areas it's about 170,000 light years across. Almost twice as large as our Milky Way.

This image was taken from my front driveway on 11/13/04 at 1:00 am est with my new atk-2hs webcam. The small image below is with some false color added. The negative image beside it shows that M77 is larger than it first appears and in fact, its gasious envelope is almost as big as the galaxy itself.

Techno Stuff: 11/13/04 at 1:00am est (6:00am ut), LX-90 8" sct, baader ir, atk-2hs, gain 100% gamma 0% saturation 50% brightness 50% white
balance-outside, 22 frames out of 70 processed in k3ccdtools, registax
and photoshop, dark frames used


©2006 Richard Murray

Friday, November 12, 2004

M27 the Dumbell Nebula


©2006 Richard Murray

M27 has the distinction of being the first planetary nebula ever discovered, by Charles Messier on July 12, 1764. It's interesting to note that we are seeing this nebula face on rather than edge on. If we were to see it edge on it would probably look very similar to M57 the Ring Nebula (see my Archives: 8/8/04-8/14/04 on the left). This is a relatively young nebula being only 3000 to 4000 years old.

It also contains on its outskirts a variable star, referred to as the 'Goldilocks Variable' which was discovered by Leos Ondra. He found the variable quite by accident while looking at two different 1990 magazine covers that both featured a picture on their covers of M27. One picture had the variable star in it and the other did not even though the pictures were taken only a few months apart. Talk about serendipity! I've pointed out where the variable star is located with two arrows in the negative image above. So the fun part of all this is that in a matter of several months this star can actually disappear from view and then gradually brighten again. Now you see it, now you don't.

This has been one of the more difficult objects for me to image and I'm glad I was finally able to show this unique nebula.


Techno Stuff: 11/6/04 at 8:29pm est (1:29am ut), LX-90 8" sct, baader
ir filter, atk-2hs, gain 80% gamma 0% saturation 50% brightness 50% white
balance-outside, 14 frames used out of 25 taken, processed in k3ccdtools,
registax and photoshop, dark frames used. I increased the blue channel
with selective color in Photoshop. The negative was created in IrfanView
and contrast boosted in Photoshop.

Saturday, September 04, 2004

M76, The Little Dumbell, Butterfly, Cork, Barbell Nebula


©2006 Richard Murray

A lot of names for one object but this planetary nebula is known
by all four: the Little Dumbell, the Butterfly, the Cork, and the
Barbell Nebula. It is the faintest and smallest object among the
'M' or Messier objects.

It is made up of two parts: the central rectangle and two faint wispy
butterfly wings. My imaging equipment only allowed me to bring out
just the beginning features of each wing but you can see them a little
better in the grayscale image on the right. If you were to search for
NGC-650 and NGC-651 in a planetarium program you would probably
be directed to M76 each time. The two numbers refer to each 'wing'
because they were thought by William Herschel to be two independent
nebula that were in contact. At each end of the rectangle there are
condensed gaseous features that appear to be the hottest and brightest
areas of the nebula. The rectangle is very similar to what we see when
viewing M57, the Ring Nebula, except in this case we are actually
viewing the cylinder of gas from the side rather than the end. And as in
the case of M57, M76's central star is visible. You can see this faint
16.5 mag star at the very center of the rectangle. It really consists of
two stars with the star that created the nebula itself appearing as a hot
blue star. Take a look at this stunning image of M76 taken by Adam
Block with a 20' scope which shows the butterfly wings and the hot blue
central star located at the top of the two stars: Adam Block M76 Image

The Little Dumbell is 3-5 thousand light years away with a length of
about one light year across. It's cylinder is expanding at the rate of
42 km/sec and it is moving towards Earth at 24 km/sec (15 miles per/sec).
The central star is approximately 90% of the mass of our sun and
eventually, as is the fate of our sun, will cool down to become a white
dwarf.

Note: The type of nebulae that I have been imaging are, for the
most part, planetary nebula (three other types are emission, reflection
and dark). The first ingredient necessary to form one of these unique
objects is a sun about the size of our own but no more than eight solar
masses. After several billions of years, when most of the hydrogen
has been burned, the core will contract, the temperature will rise and
the star will become much larger and redder. Once the helium in the
core ignites and becomes exhausted, the star begins to shed its
gaseous envelope and enters a super red giant phase with most of the
stars inner planets burnt and stripped of their atmospheres (nice
thought huh?). Over thousands of years, the stars gas is shed even
further through a process of stellar winds and 'helium shell flashes'
(don't ask) to eventually form a planetary nebula. What shape this
will take is anybody's guess which is part of the fascination in viewing
and imaging these interesting objects. After 50,000 years or so the
nebula will begin to dissipate into space leaving behind the stars old
core which will transform into a white dwarf.


Techno Stuff: 8" SCT, Mogg 0.6 fr with extension for FL 3.3,
Baader IR filter, Toucam SC1.5 normal mode, Alt 79 deg, 40.5 sec x 90,
70 frames used, dark subtract (11 frames) , 5fps, Brightness 40%,
Gamma 35%, Saturation 40%, White Balance Auto, Gain 70%,
Processed in K3CCDTools, Registax, Photoshop

Monday, August 30, 2004

M42 Orion Nebula - First Of The Season


©2006 Richard Murray

Hunting season is now officially open on the Orion Nebula and I bagged it just before dawn on 8/22/04. It was low on the horizon (about 25 deg altitude) and the sun was just about ready to brighten the sky but I managed to get in about 70 good frames.

It's nice to have this beautiful object back in northern skys after its long summer absence.

Techno Stuff: 8" SCT, Mogg 0.6 fr with extension for FL3.3, Baader IR filter, Toucam SC1.5 normal mode, Alt 25 deg, 10.5 sec x 90, 70 frames used, dark subtract, 5fps, Brightness 45%, Gamma 40%, Saturation 45%, White Balance Auto, Gain 55%, Processed in K3CCDTools, Registax, Photoshop

Saturday, August 14, 2004

Grayscale Deep Space Image Processing For Astrophotography


Updates:

4/21/05: Fix for those unable to see mask outline when returning to standard mode from Quick Mask mode (see M1, Crab Nebula section).

4/22/05: Added links to Tom How's and Jan Timmermans tutorials on acquiring and post processing where black and white webcams are used.

5/5/05: The major rewrite of the Levels and Curves section is complete along with a step by step demonstration of how to process a grayscale deep space image.

5/9/05: A 'printer friendly' version of tutorial is finished. See below.


Printer Friendly Version of Tutorial

(You can also right click on the above link
and 'save target as' for later viewing or printing)


If you're using a monochrome (black & white) webcam or other monochrome ccd imager, this tutorial is for you. It is also useful for processing the luminance channel in RGB color images.


PHOTOSHOP And The LIF²T © Method

The LIF²T Method (Lasso, Invert, Feather, Filter, and Tone) is my organized approach to the post processing of grayscale webcam images in Photoshop.

For the rest of the tutorial I'll be using my image of M64 the Blackeye Galaxy and a few other deep sky objects because they lend themselves well to demonstrating the processing techniques we'll be using. Look at M51 at the end of this tutorial where the labels on each image indicate the tools used.

The steps outlined here are not by any means the last word in image processing but merely represent the level I have reached in my own learning curve. I hope my sharing them will move a fellow amateur astronomer somewhat closer to the 'perfect' image.

A very useful way to follow this tutorial is to right click on the image of M64 below and select 'save picture as', then open it in Photoshop. That way you can use the techniques as they are discussed.


Make sure Photoshop is set to RGB Mode (Mode/RGB Color) before proceeding.

LASSO INVERT FEATHER

At the outset I want to discuss the three most important tools in Photoshop for deep space image processing: Lasso, Invert and Feather. I use these three in almost every aspect of image processing including stretching, toning and filtering. Image post processing of deep sky objects can present some unique challenges. For example, most galaxies have fairly detailed inner cores while at the same time they can have very wispy almost ephemeral spiral arms. Nebula can have similar characteristics where you have to process detailed inner cores and wispy outer cores or bloated stars that are embedded in the nebulosity itself. If you attempt to process these images as a whole you will gain detail in one portion of an image while sacrificing another. That's where the Lasso tool comes to the rescue which is usually found in the Photoshop tool box and looks ,as the name implies, like a lasso with a knot on the end. Using the lasso tool just draw a circle anywhere on an image or draw several circles by holding down the shift key as you draw each one. Make sure you close the end of the circle completely (first image of M64 below).


Now go to Levels (Image/Adjust/Levels) and make a sharp move using one of the sliders. You will see that the tone within the circle changes significantly while the rest of the image remains the same (middle image). Now click on cancel, leave the circle where it is and move your mouse pointer up to 'Select' and click on Inverse. Go back to Levels and move one of the sliders sharply to the left or right. Now the image area outside the circle changes and the area within the circle remains protected (bottom image). Now we have a technique where we can protect a galaxy core while we work on getting some definition to those wispy spiral arms or protect the arms while working on the core.

But if you were to just use these two tools alone, you would soon find out that for some reason the two or more separate areas you processed independently of one another just don't look natural. Their edges are too sharp and they don't blend well together. That's where the Feather tool becomes one of the handiest tools on Adobe's invention list. This tool is located in the Lasso tools dialog box where the brush sizes are also located. Click on Lasso options and you will see the Feather box where you can set the size in pixels. I usually work in pixel sizes from 5 to 50. Experiment with this setting and you will see that the different Lasso'd areas now blend very well together with no more sharp edges. You must draw a new lasso for each change in feather size to take affect. Once you are done making your adjustments to a protected area just click on the image and the end result will appear. Keep in mind that a side effect of processing different areas of an image is that the tones of these parts may not match and will require additional adjustments usually involving the use of levels or curves.

Once you have set your feather size in pixels and drawn your lasso you may want to view the actual size area that will be affected prior to making any changes. To do so just click on the Quick Mask button located at the bottom of the tool bar. It's one of two buttons that look like the sun or a Japanese flag and is the one located on the right. The lasso'd area will be in red. As you change the feather size and then redraw your lasso from Standard Mode (the Japanese flag button on the left), then switch back to Quick Mask mode (the Japanese flag button on the right), the red area will change. Try it. Here's an image with the feather set to 10.


Tip: Hmmm .... I wonder what would happen if we set feather to 50 and then drew a lasso around the entire M64 galaxy and clicked on inverse? Then we played around with the Levels sliders or Curves or maybe Selective Color. I'll bet the entire background would change without anything happening to the galaxy at all! Read on.

When you have a complicated shape like M1, The Crab Nebula (see image below), with all of its surrounding filaments, you may want to try a slightly different technique to protect it from processing or to process it alone. Click on the Quick Mask button, then select the Eraser tool and choose the smallest or second smallest brush you can find and begin to draw over the filaments. Once finished you can then draw as intricate an outline as you want all the way around the portion of the nebula near the inner tips of the filaments. You may want to use the Zoom tool to enlarge the image before drawing. You'll see that the lines will all be in red. When you're done with that, pick larger size brushes until you have completely filled in the outline. The second image below shows a partial fill in as well as the line outlining the nebula.


Once the nebula mask is fully filled in click on the standard mode button to the left and you'll see a nice outline of the Crab Nebula. Now when you attempt to make a change in the image, only the background will change. Select inverse and only the nebula will change. That's right, just the opposite of what happens when you draw just a simple lasso. If you do not see the outlined area when you go from Quick Mask back to Standard Mode, just do this: while in Quick Mask mode double click on the Quick Mask button and click on 'Selected Areas' then click ok. Then delete your image, reopen it and the functions should work as described above once you have redrawn and filled in the Crab Nebula and switched back to Standard Mode.


And here is the final result, a clearer image showing more defined filaments.


Tip: What would happen if we clicked the Quick Mask button, set the brush size to the second largest size, outlined just the filaments alone and nothing else, went back to standard mode, clicked on inverse and adjusted the brightness by using lets say the curves tool? Take an image you have or right click on my image of M1, save it and try it!

TONING

This portion of the tutorial includes a complete step by step demonstration of how to process a deep space image using Photoshop and at the very end PixInsight.

Please keep in mind that the following discussion involves the manipulation of grayscale images but I use many of these same techniques for color images as well.

Lets move deeper into Photoshop where all of the 'heavy LIF²Ting' (sorry, couldn't resist) of image manipulation is done. I use Photoshop 3 for image processing and while other higher versions of Photoshop have the same tools they may be in different locations.

As we go through the tutorial and make use of the Levels and Curves functions, you may notice that your histograms in Levels and your curve adjustments in Curves don't match up with my instructions. That's ok because the way you use the tools will never completely match the way I use them. Just try to come close to matching the images shown. Always pay more attention to learning how the tools are actually used rather than the specific adjustments I instruct you to make.

After opening the final Registax image, I always start out a Photoshop session by going to Levels (Image/Adjust/Levels).

Here's an image of M64 which was stacked in Registax3 that you can work on while we are going through the tutorial (just right click on it and 'save picture as') and load the image into Photoshop. Keep in mind as we go through this portion of the tutorial that we are working in JPEG or .jpg format which contains less information that the normal .bmp format I normally work in. So we won't be getting a final result in the image we normally would. But it will be useful enough to show what this technique can accomplish.


When you first open the Levels window you see a histogram chart, the filled in black portion of which represents all of the information contained in the image. Our task is to keep all of the information we want and to throw out what we don't want. It's actually a lot simpler to do so than you might think because all we are essentially doing is setting new black and white points in the image. Take a look at image just below. That's the histogram chart of the above M64 image before any changes have been made. There are three slider triangles, the one on the left is shaded black, the middle is shaded gray and the far right is shaded white. They represent all of the tones in the image from black to gray to white and everything in between.


Once you have loaded the M64 image into Photoshop, click on the Lasso tool, set your Feather to 10 and encircle the galaxy core. Then click on Inverse and then on the Quick Mask button. You should see the galaxy core shaded in red. Remember, any area shaded in red is the protected area and only the area outside it will be affected by any adjustments to the image. If the core is not shaded in red, switch to standard mode and go back and click on Inverse again.


Now we are ready to make our adjustments. Look at figure number 1 of the figures labeled 1-4 below. This is the histogram of the non protected area outside the galaxy core before any adjustments have been made. Open the Levels window and you should see close to the same histogram. I say close because you probably encircled just a little bit different area of the core than I did. First drag the black slider triangle on the left towards the right just up to the edge of the beginning of the histogram (see figure 2). Drag the white slider on the right to the left until the middle gray slider reaches the unbroken part of the graph (as in figure 2). Looking at the image, you should see that the spiral arms have brightened quite a bit and that we have some noise on the outside portions that we will have to get rid of. Click on the preview box if you want to see the before and after images. Click ok. The important point of our adjustments using Levels is that we haven't thrown away any of the original information in our image that we started out with. So all of your hard work at the telescope getting this image in the first place isn't wasted.


Now go to Select and click on Inverse so we can adjust just the galaxy core alone. Open Levels and you should see something similar to figure 3. This is the histogram of the galaxy core alone (which also includes the slider adjustments that we are going to talk about next). Move the left slider (black) to the right until it is just touching the edge of the histogram. Move the right slider (white) to the left a small amount until it reaches the beginning of the first small spike in the graph. If you don't see a spike, just move it in about the same amount. There is nothing magic about this second slider move. I just decided to do it because I liked the affect on the image. Nothing more. I threw out just a small amount of information for what I perceive to be the greater good for the image as a whole. You'll learn this through practice and experimentation. The galaxy core should now be quite a bit darker than its surroundings.

Next, click ok to close the Levels window and then click anywhere on the image to make the Lasso disappear. Save your image.

When you save an image you should give it a name that includes the tool you just applied to it. In this case something like m64levels-core-spiral.jpg to signify that the core and spiral arms were adjusted using Levels. It's very important to do this at each major adjustment point because, if you are unhappy with the final result, you can start over again at any point in the process.

Your M64 image should be similar to the one on the left below. Your image from within Photoshop will probably appear lighter which is ok (saving in the .jpg format can sometimes cause the image to be darker).


Our next task is to clean up the image area outside the galaxy by throwing out some information in the histogram. This is a third method and probably the fastest (the other two being setting a new black point and selective color) for clearing up background clutter. Click on the Lasso tool and set Feather to 30; then draw a lasso around the entire galaxy to include both the core and spiral arms. I went out about 1/4 inch extra around the galaxy spirals to make sure I didn't wipe out any potential information there. Select Inverse, click on the Quick Mask button and check on how much of the galaxy area your protecting. Click on the Standard Mode button. Now click on Levels to open the Levels histogram window. Referring to figure 4 above, we're looking at the histogram which represents all of the noise outside the galaxy that we want to get rid of (except, of course, for the stars). So let's wipe it out. Move the left slider to the right until it reaches the bottom right side of the graph. Notice in the image how the graininess disappears as you make this move. There is a small amount of information in the graph that trails out to the right of this that we don't want to get rid of because that is where the stars are located. To see what I mean take the far right slider and move it to the left. As you do so, and the middle slider reaches the right side of this information, the stars should start to brighten. As you proceed further to the left they will brighten considerably. Don't go too far to the left or you'll begin to approach some information in the spirals that will distort their tone. When your satisfied with the stars brightness level, click ok and then click anywhere on the image to remove the Lasso. Save your image. Now your image should look similar to the one on the right above. The background looks much better.

It's now time to even up the tone difference between the core and the spirals and the best place to do that is using the Curves function (Image/Adjust/Curves). This is the stage where Curves become more useful because you are able to make more subtle tone adjustments than you can with Levels. First click on the Lasso tool, set feather to 20 and draw a Lasso around the galaxy core. Now open the Curves window. We want to lighten the tone of the core but not too much because it's naturally darker than the surrounding spirals.

A very uniform and simple adjustment method for Curves that is useful for any kind of deep space image involves the placing of 3 dots on the diagonal line from where you will make all adjustments. You can always try other techniques later (one of which I explain below) but for now this is an excellent method. Referring to the figure below, place three dots in the A, B, C positions indicated in figure 1 below by just clicking on each spot. Keep in mind while making these curve adjustments they don't have to be exact and you may want to alter my instructions to suit your own taste.


Now holding down the ALT key click anywhere on the curves graph. You should see smaller squares as in figure 2 above (if not just follow along with the larger squares). Referring to figure 1 below, beginning at the A position, click and hold down while moving diagonally up until you reach just a little beyond the top left corner of the small square. Leave position C where it is. At position B move the dot straight up about halfway up the square. Click ok. Now the core matches a little closer with the spiral arms.


Go to Select now and click Inverse so we can protect the core and work on the spiral arms. Launch Curves again, hold down the ALT key and click to get back our large squares and set your three points again at positions A, B, C. Press the ALT key and click to go back to small squares. Referring to figure 2 above, drag position A to the top left corner of the small square. Drag position C to the bottom right of the square. Drag position B directly up to the top right corner of the small square. Click ok. Save your image. Below left is the result of the curves adjustments. You should still see the lasso around the core. If not, lasso the core again.


With the major curve adjustments completed, tonal range adjustments come next. Tonal range adjustments can actually be used as a stand alone curves method but I use them to fine tune our previous curve adjustments. I would expect that your tonal range measurements will not be exactly the same as mine, so the dots on the graph may be in different locations. Just adjust the curve until the resulting changes in the image are fairly close to the images in the tutorial. Activate Inverse now so we can work on the core. Bring up the Curves window and go over to the image and place the cursor over the upper right tip of the core just inside the lasso (the cursor is in the shape of an eyedropper). As you click and hold the mouse button you should see a small square appear on the curve window graph. Note its location and go over to the curves graph and click once on that spot leaving a dot where you clicked. Now go back to the upper tip of the core and while holding down the mouse button drag diagonally until just before you reach the bright white circle of the inner core. Note the location of the small square on the curves graph and go over there and click on that location which leaves another dot. You've just set the fine adjustment area for the galaxy core. We weren't interested in changing the bright white inner core and that's why we didn't include it in the tonal range measurement. Figure 1 below is the tonal range of the core before adjustments. Referring to figure 2, move the bottom point laterally to the right and the top point diagonally down to the left. As you can see tonal range adjustments require only very fine movements. Click ok to close the Curves window.


Let's set the tonal range for the spiral arms next. Activate Inverse, and bring up the Curves window again. Move the cursor to the right tip of the core again and click and hold down the mouse button, only this time move it just outside the Lasso line and observe the position of the small box on the curves graph and go over and place a dot at that position. Bring the eyedropper back to the same position on the image and move it out diagonally to the very edge of the spiral arm. Then mark that small box position on the graph. Now you've defined the tonal range for the spiral arms. If you wanted to refine this a little you could go around to different positions on the spirals and come up with an average tonal range but for our purposes one measurement is enough. Figure 3 above shows the tonal range before adjustments. Referring to Figure 4 above, grab the bottom dot and move it straight up until it reaches the line above it. I told you these were very small moves. No need to move the top upper dot, unless you want to. Click ok to close the Curves window. Save your image. The result of the tonal range adjustments is the image above on the right.

Next let's highlight some of the existing structures in the spiral arms using the Dodge tool which has a function that can be useful in highlighting difficult to process areas such as galaxy arms and nebula detail. You may have existing objects in an image that you would like to highlight or tone more which is of course what we have been doing all along. But if you set the exposure of the dodge tool to a very light setting such as 8 to 10 and select a fuzzy brush size which matches the object, filament or swirl you want to highlight and click on or run over the object you can achieve a very subtle enhancement to the image as a whole. Be careful with the use of the dodge tool because if you're too heavy handed you can end up adding information to an image that was not originally there and that's a big no no in image processing.

We want to highlight some of the faint structure in the spiral arms, so select the Dodge tool from the tool box which is shaped like a black lollipop with a stick on the end (usually at the bottom of your toolbox). If you don't see the lollipop symbol in your tool box, but see a hand or a sponge instead, go to the Toning tool options window and select Dodge tool from the drop down menu. Set the exposure level to 10 and make sure Highlights is selected. Use the first or second fuzzy brush size depending on the object filament or swirl you're trying to enhance. Then just run the Dodge tool over what you want to highlight. The result of using the Dodge tool is the upper image on the right. Save your image. You can see that the result is very subtle and in fact we don't want any big changes here.

Looking at the progress we've made so far, the stars seem somewhat bloated and not as bright as they were before. Let's correct that. Select the Zoom tool from the tool box and zoom in on a couple of the stars. Then select the Lasso tool, set your feather size to 2 pixels, and draw a lasso around a star. Then, while holding down the SHIFT key, draw lassos around the remaining stars. There are a couple of faint stars embedded in the spirals that we should also highlight (remember to hold down that SHIFT key or you will lose all your lassos!). Now select the Zoom tool again and while holding down the ALT key click on the image to zoom out to normal size. The lassoed stars image is on the left below.


Time to bring up the Levels window and move the left very bottom slider to the right until it reads '30'. This should brighten the stars somewhat. Click ok, and move to Select/Modify/Expand. Set Expand By to 2 pixels to ensure that the lassos fall outside the stars. Click ok. Next go to the Filter drop down menu and activate Filter/Other/Minimum and set the radius to 1 pixel which should debloat the stars and probably cause them to fade. To correct the star fade, select the Toning tool (black lollipop) and in the Toning tool options window make sure Highlights and Dodge tool is selected. Also set the Exposure to 100% and select the smallest fuzzy brush size in the brushes area. Click twice on each star, which will maintain their relative magnitudes, and each star should brighten. If you go too far in brightening them, just hold down the ALT key while you click and they will dim with each click. Zoom out to normal size. Save your image. Your image should now look something like the one above and to the right.

FILTER

Let's see if we can gain more detail in the core area by doing an Unsharp Mask. Select the Lasso tool, set Feather to 5 and draw a Lasso around the core. Open the Unsharp Mask window (Filter/Sharpen/Unsharp Mask). Set the amount to 100% and the Radius to 3.0, leave the Threshold at 0. Click ok. Now activate Inverse to protect the core, open the Unsharp Mask window, and move the Radius down to 1.0. This will sharpen the stars and bring out a few details in the spiral arms. Click ok and click on the image to remove the Lasso. Save your image.

You'll probably notice that the core and a small part of the spiral arms have a grainy texture. One way to get rid of this is to use the Lasso tool to isolate the portions of the image you want to smooth and apply a small Gaussian Blur (Filter/Blur/Gaussian Blur) to them. If you prefer to use Photoshop for this, just draw a Lasso around the area you want to smooth, go to Quick Mask and make sure it is NOT in red, go back to Standard Mode, launch the Gaussian Blur window and adjust the Radial slider until you're satisfied with the results.

But I've found that a better way is to open PixInsight and use the SGBNR function (see the PixInsight link elsewhere in this tutorial). What I like about SGBNR is that it applies a Gaussian Blur to the image without affecting any edge features it finds in the image! It just smoothes image areas where there is little or no detail. Note: PixInsight requires that you be in 1024x768 mode.

From within PixInsight, go to File/Open and load in your last saved image. Hold down the ALT key and press the N key to activate preview mode. Then go to the image and drag your mouse over the portion of the image you want to preview (or over the whole image). Select the tab labeled Preview01 which appears on the left side of the image. Now look at the menus across the top and select Process/General/SGBNR which brings up the SGBNR window. Under Low Pass Filter, change the Amount from .80 to .40. Under Edges Protection, change the Dark Sides Threshold to 0.100 and the Bright Sides Threshold also to 0.100. Now click Preview01 located at the bottom of the SGBNR window and make sure you check the little box next to the image name, click ok and you should see the preview image change. See the image below which shows the preview image after the changes were made.


You can now alternate between the Preview image and the original by clicking on the tabs at the side of the mage. If you're happy with the changes, click on Apply located at the bottom of the SGBNR window. Save your image as a .jpg file by going to Files/Save As.

Let's go back to Photoshop to make a minor change in the image. Once you've loaded the image into Photoshop, select Image/Adjust/Selective Color, and at the drop down menu where it says 'Reds' select Neutrals. Using the sliders, set Black to +6 and Yellow to -6. In my opinion, this gives a more pleasing appearance to the image without causing any significant change.

Were done! The final image appears on the left below and the original practice image in on the right.


ADDITIONAL FILTERING AND TONING PROGRAMS

I will just briefly mention some additional filtering and toning programs that are free on the internet. These programs are significant additions to post processing and should not be ignored. They are also very helpful if you have an image that does not require a lot of detailed processing and just needs a quick cleanup.

Loreal [here] is a specialized program that gets rid of star halos or 'ears' which usually result from a histogram stretch or additional processing. It is very easy to use; just point and click and the halos are gone!

NeatImage [here] is a very powerful and useful program. If you merely load an image in and just tell it to use the default settings for image cleanup without changing a thing you will be surprised at the results. Be sure and try the advanced mode which gives you complete control over noise reduction levels and sharpening. It even includes the ability to match your monitor colors with printed output. Not bad for a free program! It's one restriction is you can only save in .jpg format.

PixInsight LE 1.0 [here] Within PixInsight is Pleides older program SGBNR(Selective Gaussian Blur Noise Reduction) which does just what the name implies: a gaussian blur with noise reduction. I used this on my M51 image with a good result. Just using this tool alone can improve some images significantly. It's located at Process/General/SGBNR. I haven't had a chance to explore the rest of PixInsight's features but it does seem to be a powerful image processing program that I'm sure I'll be using in the future.

Tip: There is a very helpful tutorial about acquiring images by Tom How entitled, 'How I do deep sky imaging', where he uses a black and white ToUcam SC3 webcam located [here]

As an alternative to this tutorial, there is a very informative tutorial on image aquiring, stacking with K3ccdTools and post processing using a black and white SC3a webcam by Jan Timmermans. The link is here.

CONCLUSION

I hope you find this grayscale image processing tutorial useful. It was certainly an enjoyable project for me to work on.

I fully welcome any suggestions, comments or criticisms you may have (see 'Email Rick' link on the left). After all, this is a work in progress which I will be revising and adding to as time goes by.

Clear Skys!

Rick Murray

Wednesday, August 11, 2004

Jupiter In 3D


Got a pair of 3D glasses handy? You know, the ones that have red for the left eye and blue for the right. This is an image of Jupiter I took with my trusty Toucam webcam on 1/1/04 at 4:40am EST. I turned it into a 3D image by following the instructions in an article published by NASA which you can follow step by step to create your own 3D images. The article is located here: NASA 3D Pictures Have fun!

M57 The Ring Nebula Revisited


This is a more recent image of M57, The Ring Nebula, which was taken on 7/24/04. This image does not have artificial color processing as does the previous M57 shown earlier on this website. It is a more natural image of what the webcam actually sees when photographing this object. The webcams I use to image deep sky objects and planets are the Phillips Toucam and the Phillips Vesta Pro which have been modified to allow long exposure. In their natural state, before modification, these webcams would normally be used for video conferencing, and would sit on top of your monitor. But they have a sensitive enough CCD chip to allow them to be used for astrophotography.

The human eye sees an entirely different Ring Nebula compared to a webcam. When looking through an 8" SCT telescope, even at fairly high power, you see a small ring about the size of the end of a pencil eraser which is blueish in color and that's it, nothing more. The webcam sees something entirely different when its image is displayed real time on a laptop computer. For starters, the ring is about 10 times larger and you can see the central star! The color becomes much more detailed. Now the outside edge of the ring is red, the inner edge is blue and the middle ring section is an even lighter blue. Quite a difference from the human eye's perception.

The image color and detail can be improved even more by using software to "stack" images one on top of the other and then adjust them further in a picture editing program like Photoshop.

So if you have ever wondered why a lot of amatuer astronomers prefer imaging as opposed to just visual observing, this is why: much larger images with much more detail and color.

Techno Stuff: 8" SCT Vesta 690k RAW mode No Filter Equatorial Mount Unguided 40.5 sec x 38 Dark Subtract Brightness & Gamma 50% Gain 85% 7/24/04 2:30 am est (7:30 ut)

Here's a link to the QCUIAG Yahoo Group and the QCUIAG Archives which is how I got started in webcam astro imaging. QCUIAG stands for Quickcam and Unconventional Imaging Astronomy Group.

Saturday, July 24, 2004

Stuff To Do On Cloudy Nights Part 4 - The 'Plain Box Atari'

Tuesday, July 26, 2005

Well, I was perfectly happy with my Plain Box Atari Portable until
I put in the Star Raiders cart and found that the Video Touch Pad
didn't work in joyport 2. So I added the +5 volt connection to port 2
thinking that all it needed was some power. Nope still no go. Then
I added support for paddles 3 and 4 to port 2 and it worked!
For some reason paddle support is required to get the touch pad
to work - go figure. Then I found out that I couldn't get the
computer attack control or the shields to come up so I had to
add the difficulty switches for ports 1 and 2 which control those
functions. Whew!

So now I figured I'm finally done with this thing, yahoo!! That was
until I put in the Starmaster cart which is a Star Raiders clone and
in some respects even better than the original. In order to bring
up the Galactic Chart you have to toggle the TV Type switch (color
/black&white) so I added that.

Now I think I'm done. Yah sure, at least until I put in another game
cart I haven't played.

Rick


----------------------------------------------------

Since my last entry, I added a few bits of hardware to my Plain Box Atari 2600. A paddle control, paddle fire button and two joystick ports. The top joystick port can also control a pair of paddles. So now I can play two player games that use two joysticks or two paddles! Cool. I think I'd better stop adding things because as you can see from the side view its starting to bulge in the middle!


IT'S DONE!!! My 'Plain Box' Atari 2600 Portable. I decided building the official case was too much work for a first timer like me, so I took the inner box from an IOGEAR laptop usb card and used that. The display is an Intec 2.5" screen and the joystick is from parts of an old pc joystick. It has a DC in plug on the side below the on/off switch so you can run it from a wall outlet. It takes 6 AA batteries to run both the Atari board and the screen. You can play with or without the joystick handle because it unscrews from the pad but I actually prefer the handle for most games.

I started this project on 5/20/05 so it took me almost two months to complete. After a good amount of frustration but mostly fun I can finally say I did my first real elecronic hack.

Front

Back

Open


Well I shouldn't say it, it's really dumb to say it but I'll say it anyway: It's Allllllllliiiiiiivvvvvveeeeeee!!! A month and a half and one fried TV later I finally got video and audio to work on an Intec Screen Pad which I removed from its attached PS2 controller. There it is in the image above, Frogger actually on the screen complete with music! Now all I have to do is connect all of the joystick and paddle controls and then start making the case. You can see part of the case with some Atari lables in the background. Geezze, look at all those wires! My Atari 2600 Portable may soon be a reality. I'll put some more pictures up as I go along.

_________________________________________________________

Saturday, June 18, 2005

I decided to take some time away from astronomy for awhile and get back to another hobby of mine - hacking electronic stuff. Below is a picture of my latest project which is to build a portable Atari 2600. Below that is what it's supposed to look like when I'm done. Wish me luck!


If you're interested in doing this yourself go here:

Hacking Video Game Consoles

Wednesday, July 21, 2004

The Observatory And Mars


©2006 Richard Murray

This is my portable observatory which I finally repaired after a serious disaster last winter. This is a great observatory with only one serious drawback. In high winds it has a tendancy to act very similar to a hot air balloon. Even though I had it anchored down with six stakes during a storm last winter the winds kicked up to around 85 miles an hour, tore it up from the stakes, threw it over the roof of my house and into the neighbors back yard! Luckily no one was hurt. It's now secured with six heavy duty stakes and 5 sand filled jugs (amazingly, it only sustained minor damage).

I built the observatory from plans off the internet. The entire structure with the exception of the tarp is made of pvc pipe, glue and lawnmower tires. Total cost was about $200.

The photo to the right of the obseratory is of Mars taken with a webcam on 8/7/03 at 4:31am est. Mar's southern ice cap was at its peak when this picture was taken and Mars was one month away from its closest approach to Earth in 30 years.

Here's the link to get plans on how to build the observatory: Portable Observatory

Here's an enlargement of the Mars image:


©2006 Richard Murray

And here is a close up view of the Martian surface:

M42 The Orion Nebula

The photos below are of one of my favorite deep sky objects, M42 the Orion Nebula. They were taken with my 8" schmidt-cassegrain telescope, a Nikon 995 digital camera and a Toucam Pro webcam on January of 2004. From left to right: a raw unprocessed image with Nikon 995; an image with Nikon 995 with processing in Photoshop to bring out more nebulosity; a close up of the central region of M42 taken with the Toucam Pro webcam; an enlargement of the second photo.

Note: The Orion Nebula is large enough to encompass 20,000 solar systems stacked end to end!

Quote: Replicant: "I've seen things you people wouldn't believe. Attack ships on fire off the shoulder of Orion. I watched C-beams glitter in the dark near the Tannhauser gate. All those moments will be lost in time, like tears in rain. Time to die." 'Blade Runner' (1982)


©2006 Richard Murray

*See the Archives on the left for more astrophotos*

Two Jupiters

I couldn't think of a better way to celebrate this past new years than to do some imaging in the wee hours of the morning. Besides, in southwestern Michigan you take whatever clear nights you can get!

I have included two images. The one on the left is my second image of Jupiter using a Toucam Pro webcam taken at 4:40am est 1/1/04. The right image was taken on 11/10/03 at 6:24am est. Both images pictured were taken with the same equipment -

8" SCT telescope, Toucam Pro webcam
Televue 3x barlow lens, Baader Infared Filter

and both were taken and processed using K3CCDTools, Registax2 and Photoshop.

The major difference between the two is their altitude (and of course to some degree seeing conditions) at the time the image was taken. The one on the left was taken at an altitude of 52 deg and on the right at 36 deg. At northern latitudes it seems that a few degrees can make quite a difference in image
quality.

Note: Notice the Great Red Spot located at the lower left of the second image.

Quote: "At the time of his death, if he were on Jupiter, Elvis would've weighed six-hundred and forty-eight pounds." 'Mystery Train' (1989)


©2006 Richard Murray

*See the Archives on the left for more astrophotos*

Saturn


©2006 Richard Murray

Saturn is a great planet to photograph with its intricate rings and dozens of moons. But most important is its largest moon Titan which Cassini will soon be visiting with its attached Huygens probe. Titan is the only known moon in the solar system with its own atmosphere so Huygens 2 1/2 hour descent to the moons surface should be very interesting indeed.

So here's a picture I took of Saturn with my 8" scope and a modified Vesta webcam. This was taken on 9/6/03 at 6:44am est from my front driveway.

Note: Saturn is the only known planet that is less dense than water which means that if you could locate a bathtub large enough to put it in, it would float!

Quote: "You've never seen anything til you've seen the Sun through the rings of Saturn!" 'The Incredible Melting Man'(1977)

*See the Archives on the left for more astrophotos*

M82 The Starburst Galaxy


©2006 Richard Murray


These two images are of M82 the 'Cigar Galaxy', or better known today as the 'Starburst Galaxy', which is an edge on irregular galaxy located in the northwestern sky this time of year. It's just slightly above and to the right of the Big Dipper. I took these on 6/14/04 with my 8" scope and a modified Toucam webcam. The picture on the bottom is the original image. The image on the top was rotated and reworked to get a better look at the dark dust lane of gases that split the galaxy in two. These dark lanes were carved out when M82 collided with its sister galaxy M81, a spiral, in the semi-recent past about 600 million years ago. M82 is about 12 million light years distant. M82's core suffered dramatically from its collision and today is going through a heavy formation of new stars, turbulent explosive gas flow, and as discovered recently by the Hubble Space Telescope, the formation of 100 new globular clusters (very bright, compact groupings of about 100,000 stars) .

Quote: "NASA's Chandra X-ray Observatory has imaged the core of the nearest starburst galaxy, Messier 82 (M82). The observatory has revealed a seething cauldron of exploding stars, neutron stars, black holes, 100 million degree gas, and a powerful galactic wind." Chandra X-ray Observatory press release on January 14, 2000.


Here are a couple of links for more information about M82:

Hubble
Chandra

*See the Archives on the left for more astrophotos*

Looking Down a Tunnel of Gas at the Last Gasp of a Doomed Star


©2006 Richard Murray

Except for the rings of Saturn, the Ring Nebula, M57, is probably the most viewed example of a celestial band in the night sky. It's located about 2000 light years away, but because of its high surface brightness, its easy to spot even with small telescopes. The nebula itself is one light year across which is about 1000 times the size of our solar system. Observing the ring from Earth, we are actually looking into the end of a barrel shaped cloud of gas which has been spewn off by a dying star. As seen in the above images, blue gas near the hot central star gives way to cooler green and yellow gas at greater distances with the coolest red gas located along the outer boundary. The central stars ultimate fate is to probably end up as a white dwarf about the size of planet Earth.

I took the image on the left with my 8" SCT scope and a Toucam webcam on 6/21/04 at 12:18 am. The image on the right was taken with NASA's Hubble Telescope.

Note: The two stars seen in the central part of the left image are not actually located within it. The central star that created the nebula is very faint and difficult to observe even with large amateur telescopes. The faint speck at the very center of the Hubble image on the right is the actual dying star.

Quote:
"I first saw the Ring through a small telescope in my back yard, when I was a high-school student in the 50's. My astronomy books taught me that it was a round sphere of expanding gas." In fact, the round shapes of planetary nebulae when seen in small telescopes gave rise to the name two centuries ago: their circular disks resemble those of planets, and thus they were called nebulae with a "planetary" shape."

from The Ring Nebula Project

*See the Archives on the left for more astrophotos*

Correction: It appears that the star in the center of my image of M57 is actually the dying star spoken of above. The Toucam webcam with an 8" scope, especially with a 60 sec exposure as this was, is perfectly capable of imaging a 15.3 mag star such as this one. So, in fact, this is the central star! Look at the bottom page of this link and you'll see how the stars match up: Catching The Light (thank you, Jerry Lodriguss)

*See the Archives on the left for more astrophotos*